My TDRStyle Matplotlib stylesheet

I wanted to make plots that are visually similar to the so-called CMS TDRStyle, but using Matplotlib instead. So I created a custom stylesheet (best used with matplotlib>=3.0). Note that it is not meant to be 100% identical, as I find that Matplotlib plots look better in certain aspects and I’d rather not change it for the sake of emulating the TDRStyle.

I named the stylesheet tdrstyle.mplstyle. To use it, simply drop it in the same directory as your plotting script/notebook, then apply it:

import matplotlib.pyplot as plt

# Use the stylesheet globally
plt.style.use('tdrstyle.mplstyle')

# Use the stylesheet locally
with plt.style.context('tdrstyle.mplstyle'):
  plt.plot(...)

The stylesheet (tdrstyle.mplstyle):

### Based on built-in stylesheets: ['seaborn-white', 'seaborn-paper']

# Seaborn common parameters
# .15 = dark_gray
# .8 = light_gray
figure.facecolor: white
text.color: .15
axes.labelcolor: .15
legend.frameon: False
legend.numpoints: 1
legend.scatterpoints: 1
#xtick.direction: out
#ytick.direction: out
xtick.color: .15
ytick.color: .15
#axes.axisbelow: True
#image.cmap: Greys
font.family: sans-serif
#font.sans-serif: Arial, Liberation Sans, DejaVu Sans, Bitstream Vera Sans, sans-serif
#grid.linestyle: -
lines.solid_capstyle: round

# Seaborn whitegrid parameters
axes.grid: True
axes.facecolor: white
#axes.edgecolor: .8
#axes.linewidth: 1
#grid.color: .8
#xtick.major.size: 0
#ytick.major.size: 0
#xtick.minor.size: 0
#ytick.minor.size: 0

# Seaborn paper context
#figure.figsize: 6.4, 4.4
#axes.labelsize: 8.8
#axes.titlesize: 9.6
#xtick.labelsize: 8
#ytick.labelsize: 8
#legend.fontsize: 8

grid.linewidth: 0.8
lines.linewidth: 1.4
patch.linewidth: 0.24
lines.markersize: 5.6
lines.markeredgewidth: 0

xtick.major.width: 0.8
ytick.major.width: 0.8
xtick.minor.width: 0.4
ytick.minor.width: 0.4

xtick.major.pad: 5.6
ytick.major.pad: 5.6


### Make my modifications
### See: https://matplotlib.org/users/customizing.html#the-matplotlibrc-file for all the configuration options

### FIGURE
figure.figsize : 4.2, 4.2
figure.dpi : 150
savefig.dpi : 150
figure.titleweight : 500

### IMAGES
image.cmap : viridis

### FONT
font.size : 11
font.sans-serif : Helvetica, Arial, Liberation Sans, DejaVu Sans, Bitstream Vera Sans, sans-serif

### AXES
axes.labelsize : medium
axes.titlesize : medium
axes.labelweight : 500
axes.axisbelow : False
axes.edgecolor: .15
axes.linewidth: 1.25
#axes.autolimit_mode : round_numbers
#axes.xmargin : 0
#axes.ymargin : 0

### LINES
#lines.linewidth : 2
#lines.markersize : 10

### TICKS
xtick.direction : in
ytick.direction : in
xtick.labelsize : small
ytick.labelsize : small
xtick.major.size : 6.0
ytick.major.size : 6.0
xtick.minor.size : 3.0
ytick.minor.size : 3.0
xtick.minor.visible : True
ytick.minor.visible : True
xtick.bottom : True
xtick.top : True
ytick.left : True
ytick.right : True

### LEGEND
legend.fontsize : medium
legend.title_fontsize : medium

### GRID
grid.color : .15
grid.linestyle : :
grid.alpha : 0.6

### ERRORBAR PLOTS
errorbar.capsize : 0
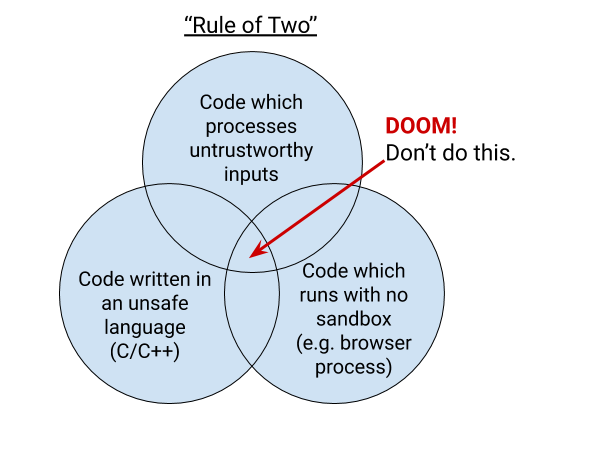
Rule of 2 when using an unsafe language

I learned today from Google Security Blog that Google follows the Rule of 2 when writing code in an unsafe language (C/C++). The Rule of 2 says that you should pick no more than 2 of:

  • untrustworthy inputs;
  • unsafe implementation language; and
  • high privilege

In other words, you should “always use a safe language, a sandbox, or not be processing untrustworthy inputs in the first place”.

rule-of-2.png

I thought that this is relevant not only in programming, but also in life. In this internet age, when you read something, you should only read/internalize subjects that you are familiar with (“safe language”), do not spread anything that could be misinformation (“unprivileged sandbox”), or not be reading from untrustworthy sources in the first place.


Graph execution in TensorFlow 2

TensorFlow 2 is eager execution by default. However, as a Keras user, when I do NN training and predictions, TensorFlow is actually running in graph execution mode. Basically, graph execution still offers better performance and can be easily run in parallel. Useful documentation about graph execution can be found at the following:

Although Keras uses graphs by default, it is possible to configure it to run eagerly. See Model training APIs. It is also possible to turn off tf.function everywhere in TensorFlow. See tf.config.run_functions_eagerly.

Note that while TensorFlow 1 was also using graphs, the graphs in TensorFlow 2 are very different compared to those in TensorFlow 1. There is no longer any session.run, feed_dict, etc. See Migrate your TensorFlow 1 code to TensorFlow 2.


Simple fully-connected NN firmware using hls4ml

hls4ml (GitHub repo) is a toolkit that implements fast neural network inferences in FPGAs using High-Level Synthesis (HLS) from Vivado. It can be used to convert NN models from popular ML libraries (e.g. Keras) into VHDL or Verilog code, which can be used to generate the firmware.

The following is an example to convert a simple, 3-hidden-layer fully-connected NN, built with Keras, into HLS firmware using hls4ml. It is done inside a conda environment.

First, create a new environment (tf) and install tensorflow and hls4ml:

conda create -n tf python=3.6
conda activate tf
pip install -U pip
pip install -U tensorflow>=2.4.0
pip install -U git+https://github.com/fastmachinelearning/hls4ml.git@v0.4.0

Create the Keras model. It consists of 3 fully-connected hidden layers with batch normalization and tanh activation. The output is a linear regression node. Save the model as JSON string, and store its weights in a HDF5 file.

import tensorflow as tf

def create_model(input_shape=(40,)):
  # Create a 3-hidden-layer fully-connected NN
  model = tf.keras.Sequential()
  model.add(tf.keras.layers.InputLayer(input_shape=input_shape))
  model.add(tf.keras.layers.Dense(30, kernel_initializer='glorot_uniform', use_bias=False, activation=None, name='dense'))
  model.add(tf.keras.layers.BatchNormalization(momentum=0.99, epsilon=1e-4, name='batch_normalization'))
  model.add(tf.keras.layers.Activation('tanh', name='activation'))
  model.add(tf.keras.layers.Dense(20, kernel_initializer='glorot_uniform', use_bias=False, activation=None, name='dense_1'))
  model.add(tf.keras.layers.BatchNormalization(momentum=0.99, epsilon=1e-4, name='batch_normalization_1'))
  model.add(tf.keras.layers.Activation('tanh', name='activation_1'))
  model.add(tf.keras.layers.Dense(10, kernel_initializer='glorot_uniform', use_bias=False, activation=None, name='dense_2'))
  model.add(tf.keras.layers.BatchNormalization(momentum=0.99, epsilon=1e-4, name='batch_normalization_2'))
  model.add(tf.keras.layers.Activation('tanh', name='activation_2'))
  model.add(tf.keras.layers.Dense(1, kernel_initializer='glorot_uniform', use_bias=False, activation=None, name='dense_3'))
  model.compile(loss='mse', optimizer='adam')
  model.summary()
  return model

def save_model(model, name=None):
  # Save as model.h5, model_weights.h5, and model.json
  if name is None:
    name = model.name
  model.save(name + '.h5')
  model.save_weights(name + '_weights.h5')
  with open(name + '.json', 'w') as outfile:
    outfile.write(model.to_json())
  return

if __name__ == '__main__':
  model = create_model()
  save_model(model, name='model')

Prepare a YAML config file (keras-config.yml). Specify the Xilinx FPGA part number and clock period. Make sure the filenames are correct. The documentation can be found here.

KerasJson: model.json
KerasH5: model_weights.h5
OutputDir: my-hls-test
ProjectName: myproject
XilinxPart: xc7vx690tffg1927-2
ClockPeriod: 5ns

IOType: io_parallel # options: io_serial/io_parallel
HLSConfig:
  Model:
    Precision: ap_fixed<16,6>
    ReuseFactor: 1
    Strategy: Latency  # options: Latency/Resource

Now, feed the config file to hls4ml. It is going to generate the project directory my-hls-test and write the firmware for you.

hls4ml convert -c keras-config.yml
hls4ml build -p my-hls-test -a  # this might take a while

# Alternatively, the last step can be done in the following way.
# The command-line options are shown at the top of build_prj.tcl.
#cd my-hls-test
#vivado_hls -f build_prj.tcl "reset=1 csim=1 synth=1 cosim=0 validation=0"

The report file can be found at my-hls-test/myproject_prj/solution1/syn/report/myproject_csynth.rpt (as I specified OutputDir: my-hls-test and ProjectName: myproject). The Verilog codes are found at my-hls-test/myproject_prj/solution1/syn/verilog/. Have fun!


Multithreading in CMSSW

Documentation about how to do multithreading in the CMSSW framework can be found at the following twikis:

The rule of thumb is that EDProducer or EDFilters should probably be a Stream module, while EDAnalyzers and OutputModules should probably be a Global module. A One module basically exists as a fallback to single-threaded processing.

From the discussion in this pull request, one could use Clang Static Analyzer within the CMSSW framework to check for thread safety. To do that, first check out the Utilities/StaticAnalyzers package.

git cms-addpkg Utilities/StaticAnalyzers

Then, call scram b with certain environment variables.

export USER_CXXFLAGS="-DEDM_ML_DEBUG -w"
export USER_LLVM_CHECKERS="-enable-checker threadsafety -enable-checker optional.ClassChecker -enable-checker cms -disable-checker cms.FunctionDumper"
scram b -k -j $(nproc) checker

The static analyzer results can be viewed in a web browser. See also: https://twiki.cern.ch/twiki/bin/view/CMSPublic/SWGuideStaticAnalyzer.